 |
| Blechnum gibbum studies © Shevaun Doherty |
“Love the process and the painting will happen”
A friend once remarked that being a botanical artist is as
much about loving the artistic process as it is about the painting.
It’s true.
I get a huge amount of pleasure out of creating study sheets and colour charts, chasing a leaf or flower across a sketchbook page, each time tweaking the
colour mixes until it’s just right.
Although there is an element of play in this, the notes that
I make are also extremely useful. I’m constantly pulling out old sketchbook
studies to find out what colour mixes I used to get a particular shade of
green, or how to achieve a particular texture.
 |
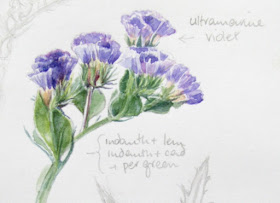
| Limonium sinuatum colour notes |
Sketchbooks and study notes help me explain my process to other artists, particularly those who are just
starting their own botanical art journey. I think it’s a bit of a relief for
them to see the messy bits and the occasional crises of confidence (help! I’ve
forgotten how to paint) !
 |
| It doesn't always work out, but making mistakes is part of the process |
Very often our focus is on the destination and not on the
journey, and that can lead to a creative block. It’s important to stop worrying
about the finished painting, that ominous blank sheet of paper, and just enjoy
the creative process that is needed to get us to that point.
It’s only paper after all.
 |
| Phoenix dactylifera leaf studies... a case of trial and error! |
Here are 6 steps to my artistic process-
Research:
I like to ‘bond’ with my subjects, and so usually start
with a bit of online research. The Latin name is a great starting point as it
often gives a clue as to where and how the plant grows, or it’s ethnobotanical story. I usually look up the botanical description of the plant too, and will
make notes on the defining characteristics of the plant, so that I can depict them in the painting.
 |
| Hey Mambo! |
Sometimes there is not much written about a plant, like the
Mambo lily I painted last year. Instead I put on some mambo music and read about
the cha-cha-cha, which I like to think bestowed a bit of “Viva la vida" vibrancy to my painting.
 |
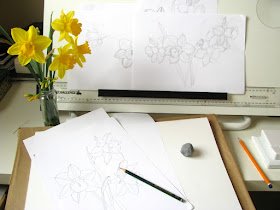
| Daffodil studies Sometimes what I discover is fascinating, and makes me view the plant with renewed wonder and respect. |
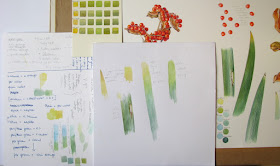
Colour matching:
Even though I pride myself on knowing my pigments,
I always make little colour charts so that I can see at a glance the difference
between the hues. There can be a marked difference between paint brands- Raw
Umber springs to mind as there is a huge difference between the W&N one and
the Daniel Smith one, and both are great. Pans and tubes of the same colour can
also yield surprising differences.
 |
| What colours are these dates? |
Colour chart made, it’s time to compare it to the actual subject
and to choose the possible colours. Greens always have to be mixed, so I
usually write out the possible colour combinations and do another colour chart
to decide which one would work best.
Studies:
Preparatory studies really help me understand my
plant. It can be daunting starting a large piece, so I often begin by painting
a leaf, or pulling a flower into pieces and concentrating on smaller parts.
This helps me focus on the colours, patterns and size. There’s a great
satisfaction in filling a page with lots of little studies. Some of them go
horribly wrong, but when there are lots of them, you don’t really see the
mistakes. By the time you have filled the page, you know how to paint that leaf
or flower!
Colour notes:
This is the part that a lot of people skip.
Admittedly I don’t make a colour chart for every painting that I do, but I’ll
nearly always jot down the colour palette and the order in which they were used
on a scrap of paper. This blog has been great for making me keep notes on what
pigments I have used. As well as being extremely useful, a row of colour notes
can really dress up a scruffy study page.
 |
| Neat or scruffy, keeping notes is very useful |
Sketches and Thumbnails:
Thumbnails and quick scribbles are the best way
to decide a complex composition. Sometimes it’s a case of a biro on the back of
an envelope, but I mainly use tracing paper to draw it all out. My sketches are
always very messy, but they are a great way to loosen up before the real
painting begins.
Big paintings can take a lot of pre-scribbles. My agapanthus
painting took a whole pad (20 sheets) of A3 tracing paper before I was happy, but
it was worth it.
Painting:
Whilst each painting is different, they always begin
the same way, with a tidy studio.
 |
| Before painting |
It will be very messy by the time that I have
finished, but I need to be organized to start. A scented candle, a cup of tea
and a good audiobook help set the mood. Audiobooks are great because I will
often keep painting just to keep listening to the story!
 |
| The creative process can be messy! |
Each artist has their own creative process. What suits some,
might feel tedious and unnecessary to others. It’s important to find a way of working that feels comfortable to you.
"The creative process is not like a situation where you get struck by a single lightning bolt. You have ongoing discoveries, and there are ongoing creative revelations.
Yes, it's really helpful to be marching toward a specific destination, but, along the way, you must allow yourself room for your ideas to blossom, take root, and grow."
Carlton Cuse


i am stuffed into the corner and it's cramped and messy and a nightmare...but somehow i manage
ReplyDeleteyou've come far chickie
Everyone has their own style, Vi. Yours works wonderfully for you. Thanks for the kind words.
DeleteI love reading about your process and seeing the steps thru photos is even better. No wonder your work is so gorgeous!
ReplyDeleteThanks Joan. You've seen me go from the beginner stage...
DeleteLovely post Shevaun. Hope to visit your studio one day
ReplyDeleteThanks Jess! Yes, please pop over to Dublin sometime!
DeleteAn excellent post - full of useful information on many levels. Your studio looks lovely. And I'm mega-impressed with the daffodils - the continue to elude me, no matter how many times I've painted them...yellow is hard!
ReplyDeleteThanks Roisin. I'm glad that you like the studio! We can definitely learn a lot from each other- I need to be as brave as you with your drawing!
DeleteIt took a very long time. It's so much easier said than done. I'm still thinking about the beautiful way you handled the foliage in that early sketchbook...
DeleteTrue, but I need to throw away the comfort blanket of a pencil, and start drawing directly with a pen when out and about. It will give my lines more confidence. Cheers Roisin!
DeleteAnother wonderful post, Shevaun. It reminded me of my first contact with you. You shared a photo of a 'third hand' device you were using to hold and magnify a small item you were painting. You immediately responded to my ignorance with openness and support and I thought, "This girl is special." And you are. Keep on truckin'!
ReplyDeleteYou must have caught me on a good day, haha! Only kidding. I think it's because I really appreciate it when someone takes the time to respond to one of my questions (and I have asked many along the way), so I always try to answer questions. Thanks for the nice words... beaming here!
DeleteI will keep this post in mind next time I start a painting! More often than not I get discouraged along the way, too much focused on the end result and not much on the beauty of the process itself. Thanks for this Shevaun, I have been admiring your work for years and your notes have been invaluable. Thank you!
ReplyDeleteThank you for those kind words, Marina. I think a lot of people feel like that about painting, to the point where they can feel intimidated by the blank page. Your own blog is lovely by the way :)
DeleteI used to think botanical art was stiff and not for me - but I am finally appreciating the research, the educational aspect, the diligence - and the elegance of the final painting. Thank you for opening my eyes more to the beauty of this style of painting. Although I know I don't have the patience for it, I so enjoy seeing your work and that of other botanical artists working today.
ReplyDeleteI know exactly what you mean! I think botanical art can be a little formal at times, particularly when it is more scientific. However there are so many wonderful contemporary botanical artists nowadays, with new approaches to composition and colour application. Botanical art is really changing for the better. I'm really glad that you are feeling inspired by it. If you don't feel that you have the patience for a large piece, why not try with a small piece, like a single leaf, fruit or seeds. Nuts are great fun to do. You've given me an idea for another blog post, thanks!
DeleteThis comment has been removed by the author.
DeleteThank you for your wonderful article and inspiration of your journey.
ReplyDeleteI'm glad that you enjoyed it. Thank you for the comment... always encouraging to read!
DeleteHave just discovered your beautiful blog...beautiful AND helpful...a great combination! i am teaching myself to draw and paint and still have a very long way to go. Thank you for the wonderful inspiration and information you share here. Can you explain a bit further how you go about making a color chart? are you mixing different pigments to try to match the colors you see in the specimen? i know it sounds like a dumb question, but i'm not quite sure what that process involves. thank you again :)
ReplyDeleteHi Starr, Thank you for the comment. It's always nice to see a new reader on the blog. I started by teaching myself too, so can appreciate your desire to know more. I was just like that too, and in fact, still am! The colour charts are mainly just the colours straight from the tube or pan... I just need to be able to see and understand what each one does. I do mix my greens, greys and blacks though. I have explained it in full on this blogpost http://botanicalsketches.blogspot.ie/2015/01/confessions-of-colourholic.html
DeleteI hope that helps! Best of luck!
Thank you so much for sharing about the process.It's wonderful to follow you until the final result
ReplyDelete